Sunday, September 29, 2013

This is Halloween!- Table runners

Thanks to Pintrest, I have no life. It all started because I wanted to make a quilt- trust me when I say that project hasn't gotten very far. In my quest to make a quilt, I came across other goodies. 10 boards and 59 pins later- here is my second attempt at using the sewing machine:
 
Here is the pin which links to the 'how to' which I used as a guide to making mine. It came out well enough that I think I will (and did) attempt another (or two). More practice for my bigger projects to come!
 
What you will need (without specific measurements, because I just winged it):
 
-Enough fabric for ~12" longer than the table and 14" wide (I had this laying around and cut it to size)
-various ribbon cut to 14" strips (again, I had most of this laying round from various other things)
-Enough fabric to make your border (I bought mine at Joannes in the scrap sections for a couple dollars!)
-Super Weight Stitch Witchery Fusible bonding web (I bought a 2 pack since it had 2 widths)
-Scissors
-Measuring tape
-Iron
 
The first things I did were measure/cut out my base material and cut my ribbon in strips. Neither needs to be perfect! The base material will get finished off around the edges with another fabric and the ribbon strips will be placed at random angles.
 
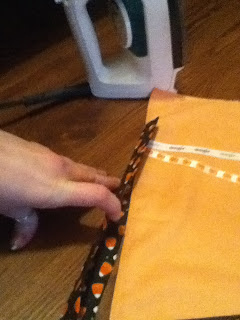
I laid the ribbon out on my material until I was happy with it, then cut strips of the bonding web and started ironing on my ribbon.
 
(My first attempt at doing this, I used the wool setting and a damp washcloth in between the iron and my ribbon. It didn't stick well. I ended up going back over the whole thing with the iron on the linen setting. Just be careful with different ribbons so as not to destroy them in the process). Once the ribbon is firmly in place, snip off any excess around the edges.


Next was the most challenging part for me. I had NO idea how I was going to make the border look nice and professional! Especially since the original tutorial was just too confusing. In the end I decided to use my bonding web to help the process along. I cut my candy corn fabric into 4- 4" strips. 2 of these were the width (plus a little more) and 2 were the length (plus a little more). Thankfully, my scrap fabric was the right size! Next I folded the strips in half to make them 2" wide strips, and used the iron to make a nice crisp edge and bonding web in the middle to keep it together.

 
Then I folded them one more time to make them 1" strips and ironed them to a nice crisp edge- easier to place and sew them in the next step.
 
Now these will cover my horribly cut edges just right!

 
With the help of my sewing machine, I less than deftly, attached them. I did the long sides first, safety pinning them to help keep them in place (I still got some puckering down the sides). To attach the width pieces, I again safety pinned them on the corners, folding/tucking the excess bits around the back.

It may not be very pretty on the backside- but hey it works!
 
 
TA DA! Its almost the exact length of my table, but I will probably be using it across the top of my bookshelf anyway, so I don't mind.
 
 
Since this is my first attempt at making something other than a pillow, I'm pretty pleased. The puckering, according to the man of the house, "looks like you did it on purpose." SO there you have it. ;)


Do you like to wing projects, too?? Share your triumphs/failures here! ;) We don't judge.


Thursday, September 26, 2013

Its a Mad Mad Tea Party

For those of you who don't know, my brother got married! And I was asked by my lovely sister-in-lawto be Maid of Honor! Probably 1 of 2 times in my life I will get to do this, so I couldn't help myself and may have gone little overboard for the Bridal Shower. Months ago the Bride approached me with an Alice in Wonderland Bridal Shower Invitation. That's all I needed... one little idea to set the whole thing in motion. I've only attended 2 Bridal Showers, 1 Bachelorette Party and 2 or 3 Baby showers in my life. So I did what anyone would do, I went to the interwebs.

Bad idea! Do you even know how many ideas there are out there!? And me being me, I just can't contain myself! So if you find yourself throwing a themed shower/party here are some ideas I narrowed down after many Google searches and hours on Pintrest (not that I'm complaining!). See my bridal shower themed board here! Not all Alice themed, but many cute ideas if money and time were no object.

Theme:

Start with an overall/general theme. Being Alice in Wonderland Tea Party Scene- I went for anything floral/pastel/pretty. There is a lot you can do with that! It helps to try to think of an idea that will not cost you an arm and a leg, especially if you keep holiday decorations by the boxful (like I do), and if you have people you can rely on to help pull it all together (ie an Aunt who is willing to prepare food).

Table décor:

Hardcover/Vintage books- without the book jackets. We scoured Salvation Army/Thrift Shops/Etc for them. Beware: Goodwill is expensive for used/old books! We decided to pick out titles that went with the theme/love/marriage/etc. In total we got 9 books titled: Catch a Falling Star (pleasantly surprised- 1st edition book from 1949 in excellent condition), The Book of Goddess, Love for All Time, Sour Puss (get it- Cheshire Cat!?), Belladonna, Daughters of Fortune, Slovak-American Cookbook (you know, the cook in the story), Reader's Digest V2 1956 (just because it was pretty looking- bonus 1st edition book!), and Misery (my own little bit of humor). Did I mention the Bride is an avid reader and lover of Vintage?

Small colorful picture frames ($ section at Michael's) with black and white character pictures inside (printed at home)- courtesy of my mom.

A vintage flocked white rabbit (again my own personal stash).

3D Red hearts (my own stash)

Oversized flowers (purchased a small bunch, other we had laying around) with googly eyes (had those laying around, too) glued on (you know, like the talking/singing flowers in Alice).

Scored a cheap pink girl's alarm clock at Goodwill. Managed to take it apart and repurpose it into a pretty alarm clock. Super impressed with myself. All other materials I used, stickers/tea cup picture, I had in my craft stash.

I got lucky with this part- soon after we started planning, I went to the Dillards Outlet. Meandered in to the Home/Textile section and what do you know- 20+ Lavender cut-out flower/butterfly placemats! At just over a dollar each we picked them all up (except a few that weren't in good shape) and even a Pink one especially for the Bride.

My dad got me 2 decks of playing cards- these I scattered on the table and used for a game (see below).


Food:

Finger Foods appropriate for a Tea Party- little sammiches, fruit salads, teas,

I was fortunate enough to start this process around Spring/Easter and found great things on Clearance at Target (gotta shop smart!)... like Pink Lemonade cookie mix with Pink Icing and candy Bunny Ears/Faces for cookie/cupcake decoration.

I personally had Valentines things in storage- hello Red Heart Plates for serving trays!

I got lucky and found pretty pink/blue watercolor flower napkins on clearance at Target! Perfect!

I had cute little tags in my craft stash that I used to label the food, Inspired by the "Drink Me"/"Eat Me" in Alice.


Games/Prizes:

Of course we had to throw in some traditional shower games. I complied a Love Libs (Mad Libs- but Wedding Advice and Wishes) from others I found through Google searches. Printed individual sentences out on cardstock and once they were filled in, they went into a scrapbook we started.

And some non-traditional/themed games (narrowed down from a list of ideas):

Queen of Hearts- Inflate red and black balloons with playing cards inside. Guests pop balloons and whoever finds the Queen of Hearts card wins a prize!

"Change Places!" Randomly throughout, one of the Bridesmaids will yell this out and everyone relocates. At the end, whoever ends up with a Q of Heats playing card under their seat wins a prize!

Everyone votes on favorite hat and dress of the day. Prize awarded for each.

Favors:

Probably my favorite aspect of the shower! Every good party needs awesome favors! I decided on [mismatched] vintage tea cups/saucers. What a chore that was! Again, Goodwill/Salvation Army/Thrift Shops are your friend- don't be afraid to go often! I tried to keep them all similar size/shape and nothing TOO modern. If I found matching tea cups/saucers I broke up the set, so it was more MAD like Hatter would want it. Each cup had a small Rabbit/Cat Key charm tied with twine to the handle. These were great because they doubled as the actual cups for the drinks we served.

Other favor options were these amazingly pretty soaps!

Favors for the games included a heart bracelet, blue heart candy dishes, a green tin lunchbox with flowers, and a floral covered notebook.

Scrapbook table and prizes


Invitations/etc:

For the invitations- I made them! I started with this cute digital stamp from Hannah Lynn. Printed it, colored it and created the invitation around it.

One of the stipulations I included were that everyone must wear Tea Party attire and a fun hat! Being that the party was in Kentucky- I went in expecting Derby Hats. Me personally, I wore a Mad Hatter costume hat. The Bride herself played the part of Alice, frilly blue/white dress and all!


None of this would have been possible without an amazing support team! My mom, the bride's mom, the bride's aunt, and the bridesmaids! SO thank you to all who made it possible!

Have you thrown any crazy theme parties? DO share!! And I'll be back with more pics later.

Wednesday, September 25, 2013

Things that happened while I wasn't here

I promise a post of EPIC size is coming soon, but in the meantime...

In no particular order:
 
Some peeps I know got married. ;)
 

I threw a Bridal Shower.- POST coming soon...
 

And took pics in a cemetary in Kentucky.


I bought a new love seat. At Goodwill. Brand new. $74. I MAY have lied about it being a "sofa" just to get it into the apartment, but it was SO worth it!

I'm that weirdo that takes pictures anywhere, including at the airport:
Lets be honest, he was dying to get his picture taken!


I was in ANOTHER car accident. Resulting in another new car.

I've been busy- what have you been up to?
 

Kidnap the Sandy Claws- Er, Holiday Shopping

Its never too early to start holiday shopping! Especially when there are other holidays in-between and stores are offering coupon codes.

So, here are my Go To Etsy shops for presents (because shopping handmade is just more fun and special!):

My dear friend Unique Nique has a shop on Etsy. It is glass jewelry, sun-catchers, spoon rests, candy dishes... One of her drool worthy items include this to-die-for Swarovski Green Pearl ring:


So vibrant in person too


Lets change gears and have some good clean fun! Sunbasil Garden Soaps- I literally shop here every year, sometimes for often when I need a fix. Her soaps range from traditional to very fun shapes, and ever recently soy wax tarts for your warmers! All her scents are divine- I wish computers had a sell feature! (PS Free shipping in the US today! $6 off international orders)
I haven't tried Frankincense, but isn't it pretty?!
 
 
Need something soft and plush? Check out Felt Me Up Designs. Her tweets are adorbs! I admired her work from afar and finally purchased earlier this year. I'm glad I did. SO cute!
 
Look at him!! His eyes say- Take Me Home!
 
I told myself I would try to do all different items, but this lady also has me breaking the bank with her jewelry. Always tempting with her pretty baubles- Miss Eternal Autumn!
 
I've been eyeing this set since the day she listed it!
 
 
To wrap it up, I'll leave you with a few other shops I've had good experiences with and they produce fine handmade products:
 
Real Wood Crafts- hand turned wood items
Hannah Lynn Art- adorable fairy/mermaid/fantasy art
hide n Seek- pretty art/jewelry
A Bit of Imagination- Geeky jewelry/ornaments
 
 
So happy shopping! What are your go-to holiday shops?