Friday, December 27, 2013

Adorably Simple (and cheap) Gifts

How to make an adorable gift- great for many occasions, not just the holidays- with a few items. Here is what you need:
 
Small candle (These candle are from Bath and Body Works- on sale 3 for $10!)
Flat Snowflake ornament or tissue paper*
Washi Tape
Ribbon*
 
*(of which you probably have laying around- otherwise the Dollar $tore is your friend)
 
Here we Gooooo:
 
 Remove the string from the ornament. Remove the front label (don't worry it still tells you what scent the candle is on the bottom) and then wrap the washi tape around.
 
Like so:


Before, during and after progress shot.
 
Set the candle on top of the ornament and tie a ribbon around both to keep them in place.
OR fold a small piece of tissue paper around the candle and tie with a ribbon bow.
TADA- bonus, the ornament is now a cute little candle "holder."
 
And, wouldn't these even make cute favors?!

Thursday, December 19, 2013

DIY Holiday Cards

Now that my cards have been sent, I can share with you all my cards!

Inspired by this find on Pinterest I decided to make my own cards. Easier said than done, but I'm pleased with the results none-the-less.

The Original


What you need:
A Cup
A paint plate
Paint- greens or blue/yellow to mix
Something for the ribbon (I used sparkly paint)
Cards/cardstock
It took me forever in Michael's to find cardstock that I liked. I went in hoping to just get 5x7 cards- apparently those are hard to come by without envelopes. So in the end I decided on round cardstock- which I thought would be cute with round wreaths.


I opted for a simple hand written message on the back- I'll sign them all later....


I leave you with this message:


Soooo fellow crafters- whats on your holiday craft list?!


Sunday, December 1, 2013

Brotherly Love- Living with Pets

So, you may or may not know, rabbits run our house. Recently, we've been trying to get our two to become more comfortable around each other. At first, it wasn't going well.

Indy, who is almost 5 years old (middle aged), has been an only bunny for the better part of his life.
He's kinda spoiled.

Nero, a rescue approximately 2 years old (teenager), wants to not be an only bunny.

This is how tonight's interaction went:

Running, scuffling, lounging, thumping. All somewhat OK until Indy decided he wanted to check our Nero's corner of the apartment. Nero comes running right over to me/us on the sofa, looks up and Thumps! Thumps! Thumps! Hilarious I tells you! This is a huge milestone in our relationship, he recognizes us and knows who takes care of things when they get out of hand. Anyway, guess its ok for him to be in Indy's business but not the other way around.

Other than that, Indy spent a good portion of the evening at my feet. He knows who his momma is. =) But hopefully we are on the right track to allow them to spend more time together and less supervised.

Everybody is back in their respective "rooms" and winding down for the evening.
 
What crazy antics do your pets get up to!?

Tuesday, November 19, 2013

Post Wedding Crafting- Part Deux

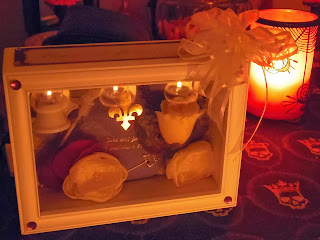
So apparently my mom realllly liked my shadow box. And wanted one for her own. Well, more like she was going to make it herself but decided I would be better at it. I'm pleased with the way hers came out, it was fun to include various items from the wedding to make a special memory/keepsake. Hope you enjoy!

(Side note: I realize this is my THIRD shadow box related post/tutorial. Is that bad?!)


Sunday, November 10, 2013

Transformation Station- Vinyl Toy Redo

 
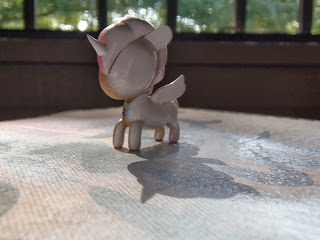
When I went to Dragon*Con two years ago (has it been that long?!?) I bought a Tokidoki blind-box Unicorn. I don't know why I torment myself with these things, I NEVER get one I actually *like*. So, its been sitting on my shelf since then, neglected and unloved. I decided to try my hand at vinyl toy art. Here are some progress shots... Primer Spray Paint (and spray paint in general) can be your best friend!
 
 
She was a weird donut theme.


She is all white now, but I haven't decided what she should look like. I might try just some Sharpie art. Will keep you all posted!
 
 
Anyone out there working on any projects?! Leave 'em in the comments!

Tuesday, October 29, 2013

DIY Up-Cycled Envelopes

The laptop is still MIA. So here's a crummy post from my iPod. I found a fun And easy up cycle on Pinterest (shocking I know).

All you need:
Return security envelopes
Washi tape


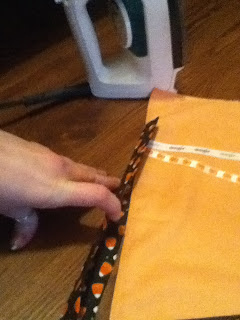
Carefully peel apart the envelope. Some scraggly bits are ok along the edges because the tape will cover it.

Reverse the envelope folds and tape!

Ta da!

Before you send out, seal the envelope with tape.

So stop throwing away those envelopes!!

What quick crafts have you whipped up lately?!

Monday, October 21, 2013

Bunny Shaming

Well, after years of protecting the cords and not having to buy replacements, the streak is over.
Poor quality picture, but you get the idea.

 I'll be squirrel-ing away my laptop battery juice til the replacement charger arrives. I promise to work on new stuffs in the meantime.

Of course, Indy thinks its a game.

Go Picnic!

I discovered an amazing product on Groupon a while back- gopicnic. Everything you need for a quick and easy meal at your desk neatly packaged in a "picnic basket". Today, while at Target, I decided to make my own. Partially due to the fact that my Target only carries 3 varieties now and they are 2 for $7- on a good sale day. When not on sale- $3.99 a box!

Here is my shopping list:

Simply Balances Fruit Strips or Twists- $2.99 for a box of 10 or 6 ($0.50)
Archer Farms Multi Seed Crackers- $2.15- 4.5 servings ($0.53)
Archer Farms Raw Mixed Nuts- $5.00/bag on sale!- 6 servings/each (bag says 11 but I need more nuts!) ($0.83)

Sistema 2 compartment container- $5


I already had a jar of Motts Apple Sauce (~$3 and 11 servings) ($0.30) and Tupperware container (~$3).

**(prices before 5% Target card savings)**

Food costs alone- $13.14 OR $2.16 per meal. (If you want to get really technical its JUST over $2.00/serving with my Target card).

Not including my granola bar, aka camuppin, I take every day. And I think I need something to put on the crackers- peanut butter, honey, Laughing Cow mini cheeses...

I'll probably substitute crackers for pretzels some days or try different varieties of nuts and crackers. I think its a good start and worth the effort (I'm not going to do all the math, but there's way less Sodium in these individually versus the gopicnic).

Needless to say I'm excited for lunch tomorrow and hopefully its as delicious and filling as it looks!


Any suggestions? How do you pack a yummy, low effort lunch?


Monday, October 14, 2013

My Interwebs Round-Up

Some people read the news daily, religiously. I choose feel good, (generally) happy readings.

So today I am going to blog about bloggers.

The sabbatical of Epbot took recently was very disruptive, so I am eternally grateful she is back! I check in almost daily to see what's new.


The Bloggess is another lady I admire. Its truly enjoyable to read about her antics. She has a book I have yet to read, so I better get on that as it'll be a TV series in a few.... years.


Other noteworthy blogs include CakeWrecks (also by Epbot, where it all started for her) which I used to read on a daily basis! Its great because posts are generally short and updated on a daily basis. Sundays are fun, Sunday Sweets offer inspiration. And CuteOverload- for your daily dose of cute aminals!!
 
 
Well, there you have it. Now, share with us your go-to-blogs, won't you?! (Not that I need more to read...)


Monday, October 7, 2013

Post Wedding crafting

When the party is over, the bills are paid and everything is cleaned up... What do you do with all the remaining Stuff?! Well, the flower part is easy. Dry the flowers for display! I took my bouquet, chose the best of the wilted flowers and dried/pressed them.

To dry flowers, hand them upside down until they get that nice crisp/crunchy feel to them. I strung them up with some hemp rope. When they are nice and dry, generously spray with hairspray.

To press flowers, you will need lots of heavy books, preferably with shiny pages. The flowers tend to stick to paper pages. Layer the chosen ones in a few books, stack them under more heavy books (I even added a large ceramic vase to the top of the stack). And let sit for many days. This process worked well for the small yellow roses and a tall purple flower. The others got brownish and not very pretty.

I took my pressed flowers, a shadow box, scrapbook paper, glue dots and ribbon to make a display.
 
The dried flowers I put in a small vase.
 
They look quite nice with my Halloween décor, don't you think?
 
My apologize for the lack of progress pictures. As usual, I thought of it too late. Plus some of you demanded to see AFTER the fact. ;)
 
 
Anyone have any wedding crafts to share?!

Sunday, September 29, 2013

This is Halloween!- Table runners

Thanks to Pintrest, I have no life. It all started because I wanted to make a quilt- trust me when I say that project hasn't gotten very far. In my quest to make a quilt, I came across other goodies. 10 boards and 59 pins later- here is my second attempt at using the sewing machine:
 
Here is the pin which links to the 'how to' which I used as a guide to making mine. It came out well enough that I think I will (and did) attempt another (or two). More practice for my bigger projects to come!
 
What you will need (without specific measurements, because I just winged it):
 
-Enough fabric for ~12" longer than the table and 14" wide (I had this laying around and cut it to size)
-various ribbon cut to 14" strips (again, I had most of this laying round from various other things)
-Enough fabric to make your border (I bought mine at Joannes in the scrap sections for a couple dollars!)
-Super Weight Stitch Witchery Fusible bonding web (I bought a 2 pack since it had 2 widths)
-Scissors
-Measuring tape
-Iron
 
The first things I did were measure/cut out my base material and cut my ribbon in strips. Neither needs to be perfect! The base material will get finished off around the edges with another fabric and the ribbon strips will be placed at random angles.
 
I laid the ribbon out on my material until I was happy with it, then cut strips of the bonding web and started ironing on my ribbon.
 
(My first attempt at doing this, I used the wool setting and a damp washcloth in between the iron and my ribbon. It didn't stick well. I ended up going back over the whole thing with the iron on the linen setting. Just be careful with different ribbons so as not to destroy them in the process). Once the ribbon is firmly in place, snip off any excess around the edges.


Next was the most challenging part for me. I had NO idea how I was going to make the border look nice and professional! Especially since the original tutorial was just too confusing. In the end I decided to use my bonding web to help the process along. I cut my candy corn fabric into 4- 4" strips. 2 of these were the width (plus a little more) and 2 were the length (plus a little more). Thankfully, my scrap fabric was the right size! Next I folded the strips in half to make them 2" wide strips, and used the iron to make a nice crisp edge and bonding web in the middle to keep it together.

 
Then I folded them one more time to make them 1" strips and ironed them to a nice crisp edge- easier to place and sew them in the next step.
 
Now these will cover my horribly cut edges just right!

 
With the help of my sewing machine, I less than deftly, attached them. I did the long sides first, safety pinning them to help keep them in place (I still got some puckering down the sides). To attach the width pieces, I again safety pinned them on the corners, folding/tucking the excess bits around the back.

It may not be very pretty on the backside- but hey it works!
 
 
TA DA! Its almost the exact length of my table, but I will probably be using it across the top of my bookshelf anyway, so I don't mind.
 
 
Since this is my first attempt at making something other than a pillow, I'm pretty pleased. The puckering, according to the man of the house, "looks like you did it on purpose." SO there you have it. ;)


Do you like to wing projects, too?? Share your triumphs/failures here! ;) We don't judge.


Thursday, September 26, 2013

Its a Mad Mad Tea Party

For those of you who don't know, my brother got married! And I was asked by my lovely sister-in-lawto be Maid of Honor! Probably 1 of 2 times in my life I will get to do this, so I couldn't help myself and may have gone little overboard for the Bridal Shower. Months ago the Bride approached me with an Alice in Wonderland Bridal Shower Invitation. That's all I needed... one little idea to set the whole thing in motion. I've only attended 2 Bridal Showers, 1 Bachelorette Party and 2 or 3 Baby showers in my life. So I did what anyone would do, I went to the interwebs.

Bad idea! Do you even know how many ideas there are out there!? And me being me, I just can't contain myself! So if you find yourself throwing a themed shower/party here are some ideas I narrowed down after many Google searches and hours on Pintrest (not that I'm complaining!). See my bridal shower themed board here! Not all Alice themed, but many cute ideas if money and time were no object.

Theme:

Start with an overall/general theme. Being Alice in Wonderland Tea Party Scene- I went for anything floral/pastel/pretty. There is a lot you can do with that! It helps to try to think of an idea that will not cost you an arm and a leg, especially if you keep holiday decorations by the boxful (like I do), and if you have people you can rely on to help pull it all together (ie an Aunt who is willing to prepare food).

Table décor:

Hardcover/Vintage books- without the book jackets. We scoured Salvation Army/Thrift Shops/Etc for them. Beware: Goodwill is expensive for used/old books! We decided to pick out titles that went with the theme/love/marriage/etc. In total we got 9 books titled: Catch a Falling Star (pleasantly surprised- 1st edition book from 1949 in excellent condition), The Book of Goddess, Love for All Time, Sour Puss (get it- Cheshire Cat!?), Belladonna, Daughters of Fortune, Slovak-American Cookbook (you know, the cook in the story), Reader's Digest V2 1956 (just because it was pretty looking- bonus 1st edition book!), and Misery (my own little bit of humor). Did I mention the Bride is an avid reader and lover of Vintage?

Small colorful picture frames ($ section at Michael's) with black and white character pictures inside (printed at home)- courtesy of my mom.

A vintage flocked white rabbit (again my own personal stash).

3D Red hearts (my own stash)

Oversized flowers (purchased a small bunch, other we had laying around) with googly eyes (had those laying around, too) glued on (you know, like the talking/singing flowers in Alice).

Scored a cheap pink girl's alarm clock at Goodwill. Managed to take it apart and repurpose it into a pretty alarm clock. Super impressed with myself. All other materials I used, stickers/tea cup picture, I had in my craft stash.

I got lucky with this part- soon after we started planning, I went to the Dillards Outlet. Meandered in to the Home/Textile section and what do you know- 20+ Lavender cut-out flower/butterfly placemats! At just over a dollar each we picked them all up (except a few that weren't in good shape) and even a Pink one especially for the Bride.

My dad got me 2 decks of playing cards- these I scattered on the table and used for a game (see below).


Food:

Finger Foods appropriate for a Tea Party- little sammiches, fruit salads, teas,

I was fortunate enough to start this process around Spring/Easter and found great things on Clearance at Target (gotta shop smart!)... like Pink Lemonade cookie mix with Pink Icing and candy Bunny Ears/Faces for cookie/cupcake decoration.

I personally had Valentines things in storage- hello Red Heart Plates for serving trays!

I got lucky and found pretty pink/blue watercolor flower napkins on clearance at Target! Perfect!

I had cute little tags in my craft stash that I used to label the food, Inspired by the "Drink Me"/"Eat Me" in Alice.


Games/Prizes:

Of course we had to throw in some traditional shower games. I complied a Love Libs (Mad Libs- but Wedding Advice and Wishes) from others I found through Google searches. Printed individual sentences out on cardstock and once they were filled in, they went into a scrapbook we started.

And some non-traditional/themed games (narrowed down from a list of ideas):

Queen of Hearts- Inflate red and black balloons with playing cards inside. Guests pop balloons and whoever finds the Queen of Hearts card wins a prize!

"Change Places!" Randomly throughout, one of the Bridesmaids will yell this out and everyone relocates. At the end, whoever ends up with a Q of Heats playing card under their seat wins a prize!

Everyone votes on favorite hat and dress of the day. Prize awarded for each.

Favors:

Probably my favorite aspect of the shower! Every good party needs awesome favors! I decided on [mismatched] vintage tea cups/saucers. What a chore that was! Again, Goodwill/Salvation Army/Thrift Shops are your friend- don't be afraid to go often! I tried to keep them all similar size/shape and nothing TOO modern. If I found matching tea cups/saucers I broke up the set, so it was more MAD like Hatter would want it. Each cup had a small Rabbit/Cat Key charm tied with twine to the handle. These were great because they doubled as the actual cups for the drinks we served.

Other favor options were these amazingly pretty soaps!

Favors for the games included a heart bracelet, blue heart candy dishes, a green tin lunchbox with flowers, and a floral covered notebook.

Scrapbook table and prizes


Invitations/etc:

For the invitations- I made them! I started with this cute digital stamp from Hannah Lynn. Printed it, colored it and created the invitation around it.

One of the stipulations I included were that everyone must wear Tea Party attire and a fun hat! Being that the party was in Kentucky- I went in expecting Derby Hats. Me personally, I wore a Mad Hatter costume hat. The Bride herself played the part of Alice, frilly blue/white dress and all!


None of this would have been possible without an amazing support team! My mom, the bride's mom, the bride's aunt, and the bridesmaids! SO thank you to all who made it possible!

Have you thrown any crazy theme parties? DO share!! And I'll be back with more pics later.

Wednesday, September 25, 2013

Things that happened while I wasn't here

I promise a post of EPIC size is coming soon, but in the meantime...

In no particular order:
 
Some peeps I know got married. ;)
 

I threw a Bridal Shower.- POST coming soon...
 

And took pics in a cemetary in Kentucky.


I bought a new love seat. At Goodwill. Brand new. $74. I MAY have lied about it being a "sofa" just to get it into the apartment, but it was SO worth it!

I'm that weirdo that takes pictures anywhere, including at the airport:
Lets be honest, he was dying to get his picture taken!


I was in ANOTHER car accident. Resulting in another new car.

I've been busy- what have you been up to?