Thanks to Pintrest, I have no life. It all started because I wanted to make a quilt- trust me when I say that project hasn't gotten very far. In my quest to make a quilt, I came across other goodies. 10 boards and 59 pins later- here is my second attempt at using the sewing machine:
Here is the pin which links to the 'how to' which I used as a guide to making mine. It came out well enough that I think I will (and did) attempt another (or two). More practice for my bigger projects to come!
What you will need (without specific measurements, because I just winged it):
-Enough fabric for ~12" longer than the table and 14" wide (I had this laying around and cut it to size)
-various ribbon cut to 14" strips (again, I had most of this laying round from various other things)
-Enough fabric to make your border (I bought mine at Joannes in the scrap sections for a couple dollars!)
-Super Weight Stitch Witchery Fusible bonding web (I bought a 2 pack since it had 2 widths)
-Scissors
-Measuring tape
-Iron
The first things I did were measure/cut out my base material and cut my ribbon in strips. Neither needs to be perfect! The base material will get finished off around the edges with another fabric and the ribbon strips will be placed at random angles.
I laid the ribbon out on my material until I was happy with it, then cut strips of the bonding web and started ironing on my ribbon.
(My first attempt at doing this, I used the wool setting and a damp washcloth in between the iron and my ribbon. It didn't stick well. I ended up going back over the whole thing with the iron on the linen setting. Just be careful with different ribbons so as not to destroy them in the process). Once the ribbon is firmly in place, snip off any excess around the edges.
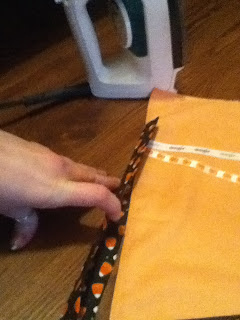
Next was the most challenging part for me. I had NO idea how I was going to make the border look nice and professional! Especially since the original tutorial was just too confusing. In the end I decided to use my bonding web to help the process along. I cut my candy corn fabric into 4- 4" strips. 2 of these were the width (plus a little more) and 2 were the length (plus a little more). Thankfully, my scrap fabric was the right size! Next I folded the strips in half to make them 2" wide strips, and used the iron to make a nice crisp edge and bonding web in the middle to keep it together.
Then I folded them one more time to make them 1" strips and ironed them to a nice crisp edge- easier to place and sew them in the next step.
Now these will cover my horribly cut edges just right!
With the help of my sewing machine, I less than deftly, attached them. I did the long sides first, safety pinning them to help keep them in place (I still got some puckering down the sides). To attach the width pieces, I again safety pinned them on the corners, folding/tucking the excess bits around the back.
It may not be very pretty on the backside- but hey it works!
TA DA! Its almost the exact length of my table, but I will probably be using it across the top of my bookshelf anyway, so I don't mind.
Since this is my first attempt at making something other than a pillow, I'm pretty pleased. The puckering, according to the man of the house, "looks like you did it on purpose." SO there you have it. ;)
Do you like to wing projects, too?? Share your triumphs/failures here! ;) We don't judge.


No comments:
Post a Comment